I have been wanting to experiment with long-fermented breads for some time, but summer seemed like the wrong time to begin the project, what with all the great weather and outdoor activities I would surely be enjoying. Fortunately (perhaps), the summer started out so despicably hot in Chicago that I spent most of my time pureeing gazpacho and re-watching Frasier episodes in my air-conditioned apartment.
As I watched the grapes coming on in the backyard (through the window), I remembered that Nancy Silverton of La Brea Bakery made her sourdough started using grapes, and that memory was all I needed as motivation to finally begin a sourdough starter of my own.
One of the things that has always intimidated me about baking is that I imagine it requires great precision, something that I can appreciate in many areas of my life, BUT NOT with regard to cooking. Perhaps the greatest triumph of this project has been the realization that starters and breads are not nearly as particular as I had previously believed, which thankfully has greatly increased my interest in making them.
Much of what I read on the subject demanded I stir my starter twice a day, keep it at a steady 72 degrees, cover it tightly with plastic wrap, and watch it like a hawk. I managed to remember to stir my starter most nights, sometimes forgetting because I kept the mixture of grapes and flour on the back porch where temps fluctuate wildly. I also covered the bowl with cheesecloth (I have an unshakable loathing for plastic wrap), envisioning this would give my breads more character. My point is that you don’t need to stress out about following a recipe to the letter. There are so many factors with a project like this that you just have to give it a go and see what happens. I lucked out and captured some freaky wild yeast that helped me to create my first super-sour rye loaf last week. Now I’m hooked and I can’t wait to keep this starter alive and see where it takes me!
Rye Sourdough Starter:
1 large square of cheesecloth (about 20 x 20 inches), plus more for covering the bowl
1 bunch of organic grapes, unwashed (about 2 cups worth)
approximately 2 ½ C. rye flour
approximately 2 ½ C. filtered or bottled water (not distilled)
Wrap the grapes in the cheesecloth and tie a knot in the top. Mix the flour and water in a medium bowl until just combined (mixture should be the consistency of a thin pancake batter). Submerge the grapes in the flour mixture, leaving the knot poking out the top. Cover the bowl with additional cheesecloth to keep out dust, etc.
Set the bowl in a warm but not hot place (between 70 and 80 degrees) for 6 – 7 days. Once each day, lift out the grapes and stir the the mixture thoroughly, re-submerging the grapes afterwards.
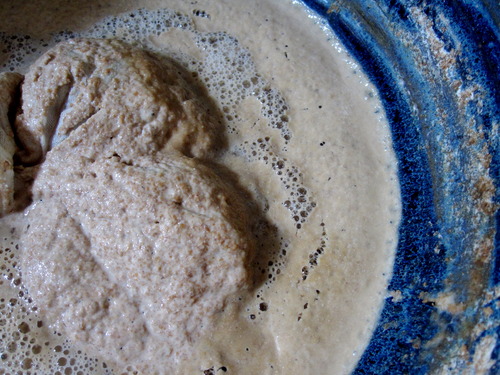
By the third or fourth day, the mixture should begin to bubble and smell sour and slightly alcoholic (see photo below from day 4 of my fermentation). Continue to ferment the mixture for 2 more days once you are confident it is headed in the right direction.
On the last day (likely day 6 or 7), remove the grapes and gently squeeze most of their remaining liquid into the starter, then discard them. At this point, you have a ton of starter, so I recommend dividing it in half (give half to a friend unless you are planning to make several loaves of bread in the next few days), and feed each half about 1 C. each of filtered water and flour. Allow the starter to sit, covered, for just one more day and it is ready to use!
If you’re not quite ready to use your starter, you can go to “maintenance” phase. To maintain your starter, keep it in the fridge in a glass or ceramic jar or bowl, covered tightly. Under refrigeration, you can get away with feeding your starter about once a week. To feed the starter, add about 1 C. flour and 1 C. filtered water as before, stirring to just combine. If you keep going like this and don’t bake, you end up with WAY too much starter, so it is perfectly fine to throw out some of your starter – just leave at least 1 C. behind to feed with the fresh flour and water.
A few days before you’re ready to bake with your starter, take it out of the fridge and begin feeding it once or twice a day to get it very active. After 2 days of feedings and warmer temps, your starter will be ready to use in a recipe. Recipes are all over the map as far as the amount of starter they call for – I used this recipe for my rye loaf, but used a full cup of starter just to be safe (starter is weaker in its youth).
Whatever portion of your starter you don’t use is then returned to the fridge for maintenance mode. The longer you keep your starter alive and kicking, the more wonderful and unique your breads will taste!


 RSS - Posts