Antipasto Salad

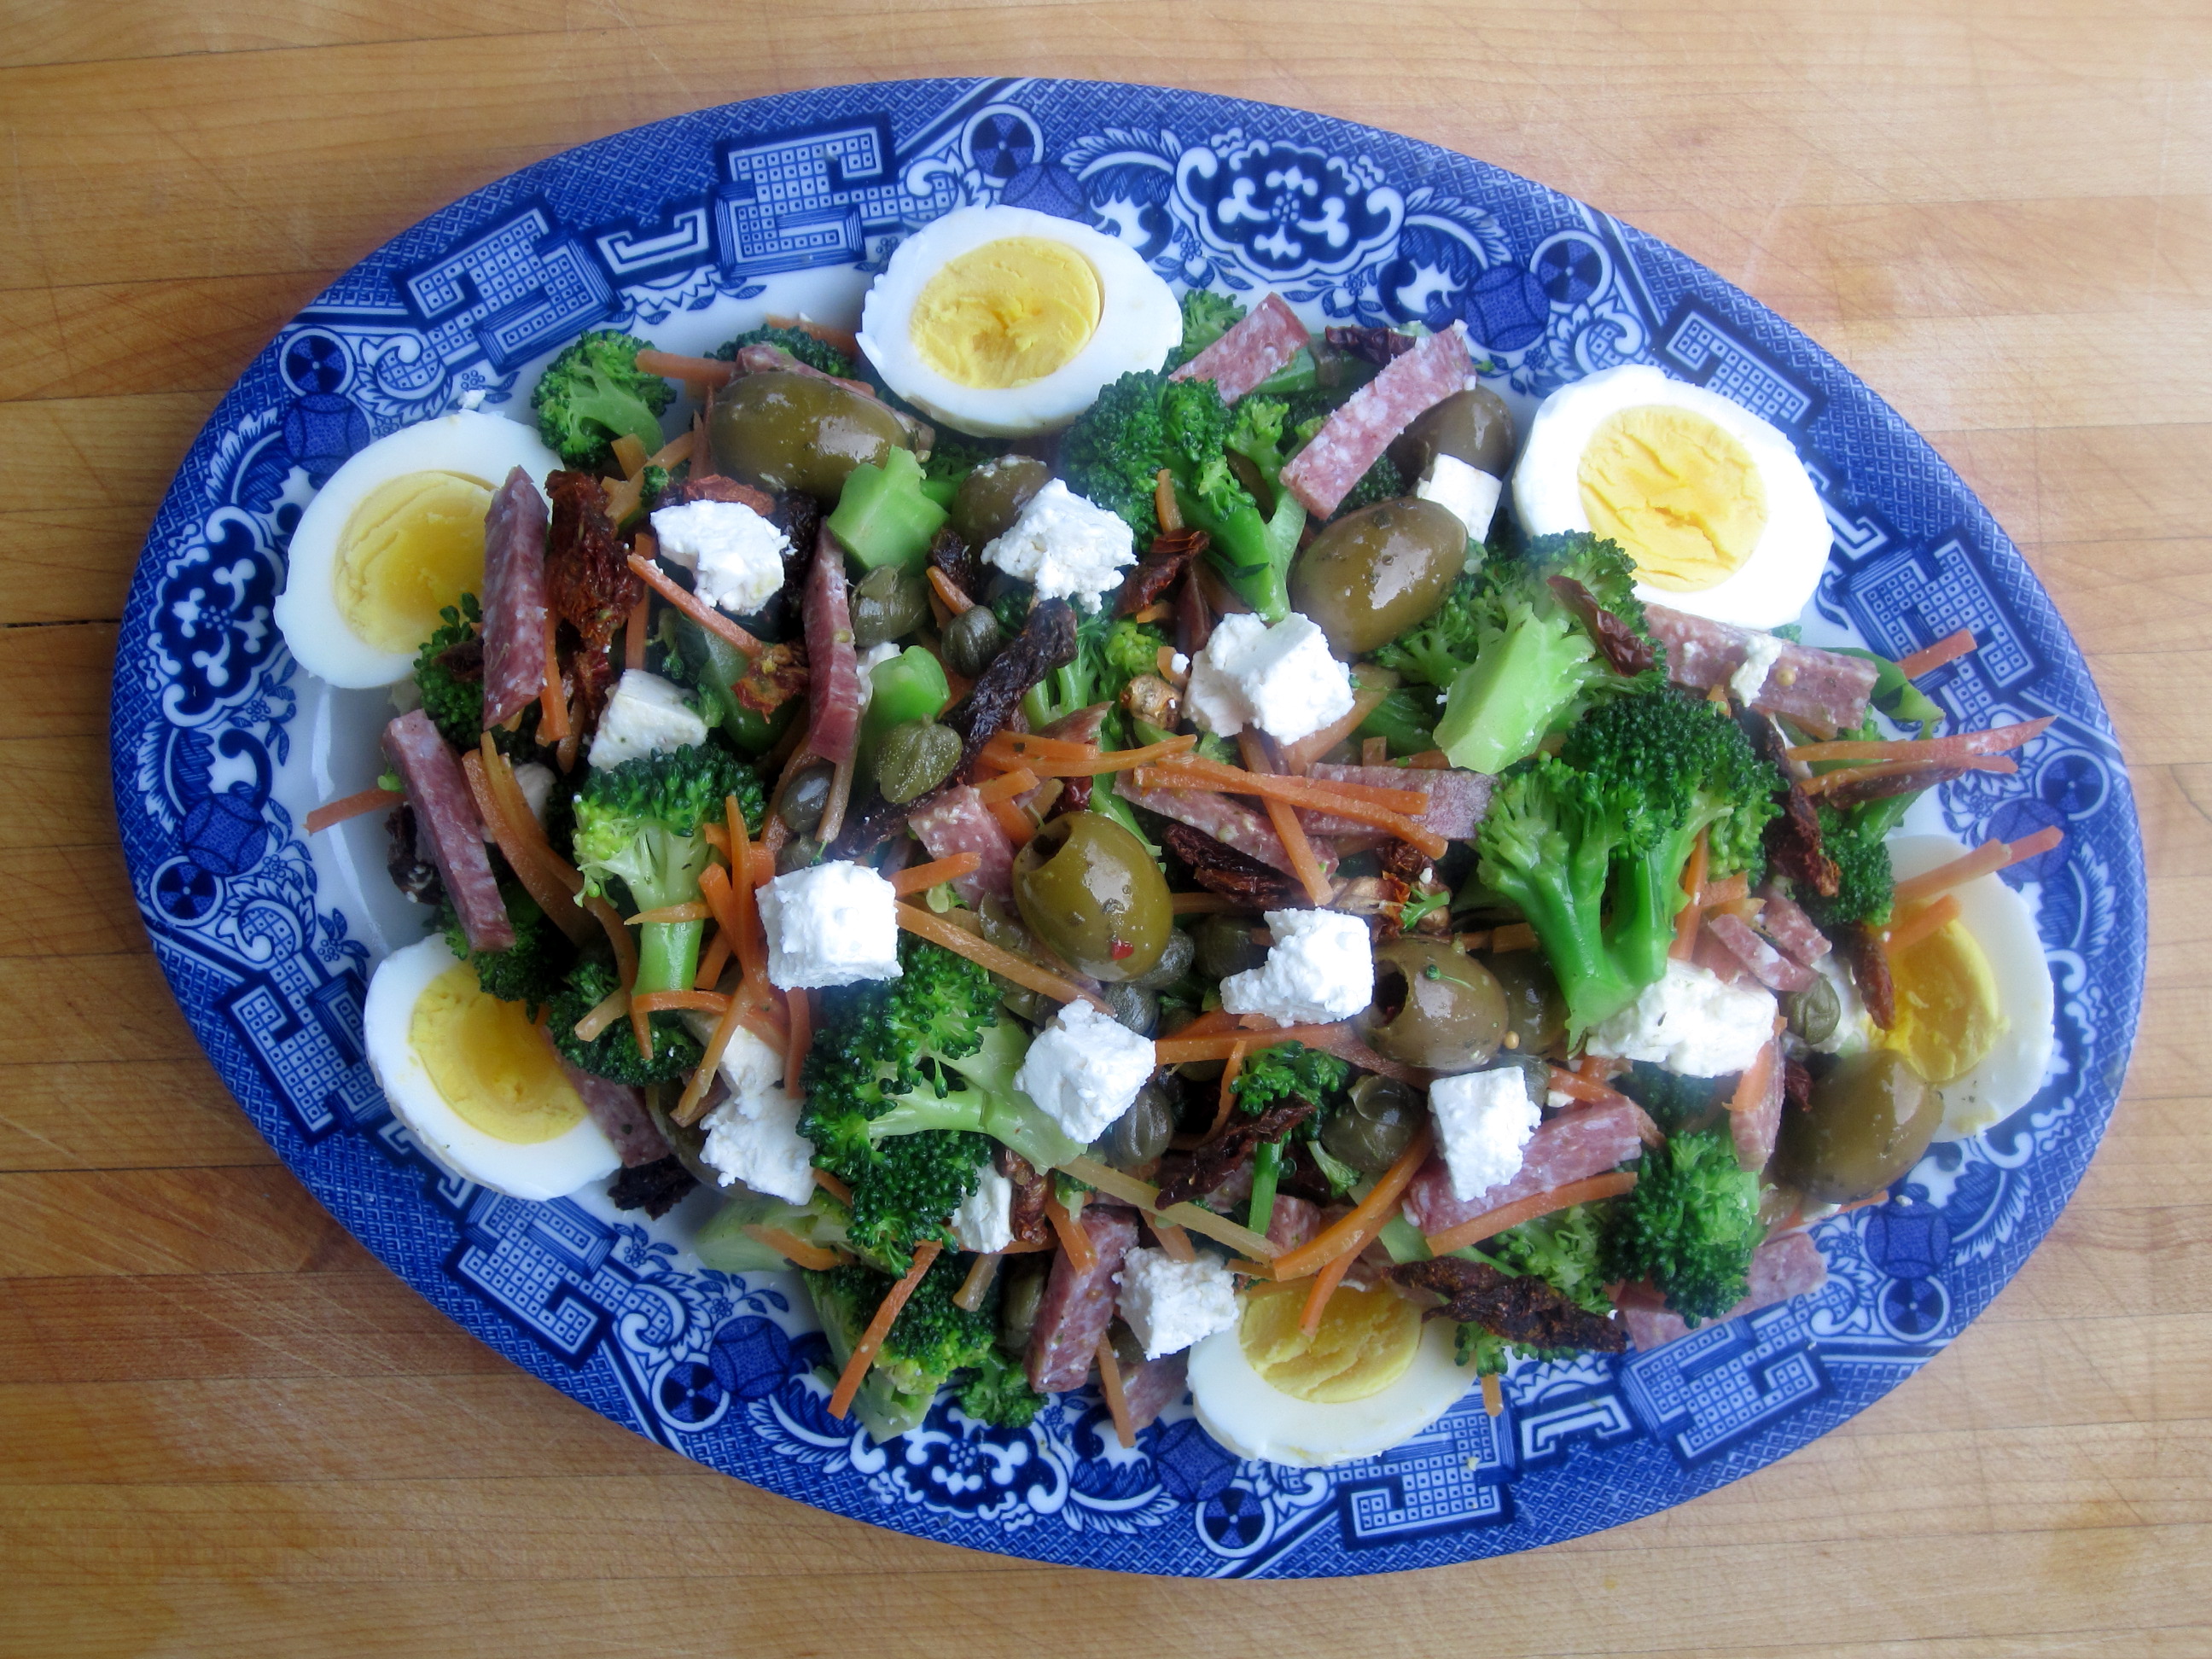
This salad is a mixture of all of my favorite things. Salami, feta, capers, sun-dried tomatoes, olives, and farm eggs, tossed with a base of blanched broccoli and carrots. As with almost all of my recipes, I encourage you to substitute, omit, and add ingredients to your heart’s content. Some other ideas I had while futzing around the grocery store shopping for this salad included cauliflower, bacon, scallions, provolone cheese, smoked salmon, roasted potatoes, and pickled peppers.

Making a salad like this each week is a great habit to get into.  It will last several days in the fridge (especially if it is only lightly dressed, as I recommend), so it’s a super easy way to throw down some vegetables and high-quality protein when you’re in need of a quick lunch or snack.

Antipasto Salad

Antipasto Salad
*serves 4 as a main course, 8-10 as a side*

2 # broccoli, broken into bite-sized florets
1 medium carrot, julienned
4 eggs, hard boiled and cooled
¼ C. sun-dried tomatoes (dry or oil-packed), julienned
¼ # salami, julienned
about a dozen of your favorite olives, pitted
2 Tbsp. capers
6 oz. feta cheese

For the dressing:

3 Tbsp. fresh lemon juice (from 1 lemon)
3 Tbsp. red wine vinegar
1 Tbsp. mustard (whatever variety you like)
a very small handful Italian parsley leaves
6 Tbsp. fruity olive oil (I like Arbequina)
S & P to taste

First, hard boil the eggs if necessary. I recommend placing the eggs into cold water, bringing them *not quite* to a boil, and then turning them off and allowing them to sit in the hot water for 7 minutes. Then transfer to a bowl of cold water to cool and peel when you’re ready.

To blanch the vegetables, bring a large pot of salted water to a boil. Blanch the broccoli and carrots for just one minute, stirring often. Drain in a colander and rinse with very cold water for another minute or until cool.

Shake the excess water from the vegetables and spread them out onto a sheet pan covered with a towel to dry. This step is important because if the broccoli remains too wet it will resist the dressing, not to mention it will go bad more quickly.

Antipasto Salad

While the veggies dry off, prep any remaining ingredients. I found very fresh sun-dried tomatoes, so I was able to use them unsoaked.  If yours are tough, soak them in hot water for 10 minutes to soften.  Oil-packed tomatoes are fine, too. If they are packed in olive oil you can even use some of the oil for the dressing. Delicious!

To prepare the dressing, place the first four ingredients into a blender or food processor, and whiz until just combined.  Then with the machine running, slowly drizzle in the olive oil to emulsify the dressing. Lastly, season to taste with salt and pepper.

Combine all of the salad ingredients except the eggs and half of the cheese in a large bowl.  Toss gently with half of the dressing, reserving the rest to add if necessary or desired. Transfer to a large platter or salad bowl, and decorate with the halved or quartered eggs, and then top with the remaining feta cheese.

Posted in gluten free, perfect health diet, salad | Tagged , , , , , | Comments Off on Antipasto Salad

Preserved Lemons & Limes

We’ve arrived at that point in the year when the produce department looks exactly the same week after week. It’s been about four months since I’ve sniffed a tomato with any fragrance whatsoever, and I cannot bear to make another side dish using kale or butternut squash.

Thankfully, my awesome local grocery store carries a huge variety of cirtus fruits, which are in season all winter long. In addition to the usual suspects I found Meyer lemons, three types of kumquats, pink lemons, heirloom navel oranges, and Rangpur limes, a mandarin-lemon hybrid from Northern India.

I decided to preserve some of the citrus in the Moroccan tradition, which simply involves jarring the cut citrus and packing it with salt and the citrus juices. The citrus will soften and pickle in a dark cupboard for at least two weeks, and then will last for up to a year for use as a flavorful condiment or in recipes.

Preserved lemons in particular are commonly used when making tagine, a slow-cooked North African stew named for the clay pot in which it is cooked. I’m looking forward to using my preserved citrus with roasted meats, in sauces, compound butters, stir-fries, and maybe even in a few cocktails.

I chose sweet Meyer Lemons and orange-skinned Rangpur limes for my recipe, but you can use whatever sour citrus you like – grapefruits, limes, lemons, or any of their relatives. Get a batch going before citrus season is over and you’ll have plenty to last you all through the summer.

Preserved Lemons

Preserved Meyer Lemons & Rangpur Limes
*makes one quart*

1 ½ # Meyer lemons, halved or quartered
1 ½ # Rangpur limes, halved or quartered
(OR substitute 3 # of the citrus of your choice)
1/2 C. coarse sea salt or kosher salt
1 quart-size glass jar with lid

*optional additions: a cinnamon stick, a few cloves or bay leaves, allspice berries, one star anise (be careful with the star anise – the flavor can get very strong very fast – you may have to remove it early), etc…

In a large bowl, toss about 2/3 of the cut citrus with the salt (reserve the remaining citrus for juice). Pack the salted fruit into the jar, using the handle of a wooden spoon or spatula to push the pieces down into every nook and cranny. Do your best not to crush the fruit, just fill the jar snugly, leaving about one inch of space at the top. Top with any salt that remains in the bowl, and then squeeze over the remaining citrus until it covers all of the fruit.

Seal the jar and invert it several times to distribute the salt and juice. Place in a cool, dark place (a lower cupboard is a good choice), and allow to preserve for two weeks. Check on the jar every few days, and if necessary, push the citrus down below the juice level before re-capping and storing. Alternatively, you can invert the jar every few days, leave it upside-down, and then turn back over again a few days later.

After the initial pickling, you may want to store the preserved citrus in the refrigerator. It’s not necessary (this technique was created as a way to preserve citrus before refrigeration, of course), but it’s the safest choice.

As soon as my preserved citrus is ready, I’ll use it in a recipe and post it here!

Preserved Lemons

Posted in gluten free, paleo, perfect health diet, vegetarian | Tagged , , , , , , , , , , | Comments Off on Preserved Lemons & Limes

Avgolemono (Mediterranean Lemon and Egg Soup)

We’re deep into January out in Oregon and it seems like almost everybody we know has been sick. Mr. Tummyrumblr and I have been doing our best to stay on ahead of the funk by eating lots of super-nourishing foods, but these last few days we’ve had a couple of scritchy throat scares. It doesn’t help that the valley weather has taken a turn for the wetter, which likely signals the beginning of “true” winter in Portland – a.k.a. two week stretches of low-hanging, light blocking clouds without a single sun break. So long, vitamin D!

Today’s recipe is my riff on Avgolemono soup, a Mediterranean broth-based soup with eggs and lemon whisked in at the end of cooking to thicken. I used my simplest chicken bone broth as the base (recipe follows), and spiced the soup with cinnamon and ginger for extra anti-inflammatory power. I then added rice and spinach along with the lemon and eggs, making this a well-rounded and filling winter meal.

Avgolemono

Avgolemono:
*makes 4 servings*

8 C. chicken broth (recipe follows)
1 cinnamon stick
1″ piece of ginger, sliced into 4 or 5 coins
3/4 C. basmati rice
2 T. butter or olive oil
1 bunch spinach, washed (or two bunches, if you’re so inclined)
4 eggs
1/2 C. fresh squeezed lemon juice, from about 2 lemons
S & P

Avgolemono

Place the broth along with the cinnamon stick and ginger into a soup pot, cover and bring to a boil. Reduce to a simmer and cook, covered, for 30 minutes to infuse the broth the flavors of cinnamon and ginger.

Add the rice and butter or oil to the pot and continue to simmer until the rice is tender, about 15 minutes.

When the rice is soft, add the spinach and allow it to wilt. In the meantime, gently whisk the eggs and lemon juice together with a in a medium bowl. While whisking, slowly pour in one cup of the broth from the soup to temper the eggs. Then add the egg/lemon/broth mixture back to the pot, stir thoroughly, and remove from the heat.

Season the soup to taste with salt and pepper (it will need quite a bit of salt if using my unsalted broth recipe), divide between bowls and serve immediately.

Basic Chicken Broth:
*yields about 14 cups of broth*

I try my darndest to make a big batch of broth every few weeks, and since committing to eating a more traditional diet, broth making has become a beloved habit. When you have broth on hand, it’s so simple to use it as a base for a quick, nourishing meal. I start my broths in the evening after dinner and allow them to cook all night at a bare simmer. Once you get the hang of it, there’s really very little work involved. I also love eating warm broth as a snack – it’s so satisfying! I cannot believe I’ve been missing out on it for so many years.

2 ½ # chicken backs
cold water to cover
16 C. cold water
1 onion, skin on, quartered
1 large carrot, large dice
2 stalks celery, large dice
5 cloves garlic, skin on, smashed
2 Tbsp. apple cider vinegar

Place the chicken backs into a large stockpot and add cold water just to cover them. Cover the pot and bring to a boil. Once boiling, remove the chicken backs from the pot with tongs and place in a colander. Rinse them of any scum, and rinse the stockpot out thoroughly as well.

Next, return the chicken backs to the clean pot along with all of the the vegetables and the vinegar and cover with 16 cups of cold water. Once again, bring the covered pot to a boil and then reduce to a bare simmer (if it simmers to high it will create too much steam and you will lose a of of your broth). Allow the broth to simmer overnight or for 12 hours to draw as much of the gelatin, minerals, and amino acids from the bones as possible.

When the broth is done, stir it thoroughly with a wooden spoon, pressing on the bones and vegetables (a metal potato masher works well, too). Pour the broth through a fine mesh colander and into another large pot or bowl, again pressing on the solids to extract all of the liquid.

Divide the broth between 4 quart jars, leaving plenty of room at the top. Allow the broth to cool fully in the fridge before covering and storing. Use the broth within 7-10 days or freeze for later use.

Posted in gluten free, paleo, perfect health diet, soup | Tagged , , , , , , , , , , , | Comments Off on Avgolemono (Mediterranean Lemon and Egg Soup)

Steelhead & Leek Chowder

I really missed the food culture in Western Oregon while I was living halfway across the country. Every summer when I visited I would get myself immediately to the farmer’s market, and year after year I’d be totally blown away by all of the beautiful and plentiful food. And while I’m looking forward to the super-bountiful summer growing season, I’ve been enamored with all of the amazing, local food I am still able to get in the middle of winter, especially meats and seafood.

My newest favorite stop is Flying Fish Company on Hawthorne Blvd. here in Portland. I love it not only because they carry a huge variety of the freshest, most beautiful fish, they also have farm-fresh, local eggs, pork, lamb, and organ meats (among other things).

Earlier this week I stopped by and picked up a beautiful filet of Steelhead (see below), a dozen fresh oysters from Netarts Bay on the Oregon Coast, and an extremely fresh, deep, rich red hunk of beef liver.

Steelhead Filet

Steelhead belong to the same genus as salmon, but they are actually a species of sea-going trout. Unlike other trout which live their entire lives in rivers, steelhead are migrate to the Pacific where they mature for a few years before return to their hatching waters to spawn. Steelhead eat a diet essentially identical to salmon, so they are wonderfully fatty and omega-3 rich.

Steelhead makes a great addition to this basic chowder recipe, but almost any type of seafood could be used. Salmon, halibut, shrimp, oysters, and perhaps most classically, clams, come to mind.

Be sure to add the fish at the last minute so that it does not become overcooked.  If you’re planning on storing and then reheating the chowder, remove the soup from the heat before adding the fish and then stir regularly to help it to cool more quickly.

Salmon & Leek Chowder

Steelhead & Leek Chowder
*serves 8*

4 Tbsp. (½ a stick) butter
3 large leeks (see preparation instructions below)
2 stalks celery, small dice
1 medium carrot, small dice
5 – 6 cloves garlic, thinly sliced
2 Tbsp. tomato paste
1 C. dry white wine
2 bay leaves
1 large sprig fresh thyme
1 qt. fish stock (if your fishmonger doesn’t sell it fresh, check the freezer section at your grocery store)
1 qt. cold water
2 ½ # russet potatoes, large dice (roughly ¾” cubes)
2 # salmon, cut into 1” chunks
S & P

To prepare the leeks, cut off the tops and bottoms and discard, leaving only the white and lightest green part of each leek. Split the leeks lengthwise and rinse thoroughly under cold running water to remove and dirt or sand from between the layers. Cut each cleaned leek in half lengthwise once again and then chop each length into approximately 1/4″ pieces.

Steelhead & Leek Chowder

Melt the butter in a large stockpot over medium-low heat.  Add the leeks, season them generously with salt and pepper and sauté, stirring often, for 6 – 8 minutes or until very soft. Add the celery, carrot, and garlic, and continue to cook for a few minutes longer until garlic is fragrant. Add the tomato paste and stir to combine all ingredients thoroughly. Add the wine, bay leaves, and thyme, increase the heat, and bring to a simmer. Cook for about 5 minutes or until the wine has reduced by half.

Add your potatoes, fish stock, and cold water along with a generous pinch of salt. Cover the pot, increase the heat to medium high, and bring to a boil. Once boiling, remove the lid and reduce the heat so that the chowder is at a moderate simmer.  Cook the potatoes for approximately 15-18 minutes, or until the potatoes are very tender and just beginning to fall apart.

Add the Steelhead and cook for 5 minutes more, or until it is just cooked through. Season to taste with salt and pepper, and serve immediately.

Posted in gluten free, paleo, perfect health diet, seafood, soup | Tagged , , , , , , , | Comments Off on Steelhead & Leek Chowder

Bolognese Sauce with Chicken Liver

I’m finding all sorts of new ways to sneak liver into my meals in order to meet my weekly quota. Liver makes a great addition to an acidic sauce like this traditional bolognese because it adds richness and depth, not to mention lots of vitamins and minerals. After doing a little research, I found that it wasn’t unheard of to use chicken livers in a bolognese sauce back in the day. I really wasn’t surprised about this after I tasted the sauce – it really is made wonderfully creamy with the addition of the livers.

Next on my list is to try this recipe using beef or lamb’s liver. While I really love the flavor of chicken and pork liver, I haven’t yet fully embraced beef or lamb so I still have to hide it in my recipes. I’m hopeful that my taste for it will grow over time, just like it has for runny eggs and strongly flavored cheeses. Heck, if I can eat as much beef liver as I do aged, raw milk cheese, I’ll be set for life!

Bolognese with Chicken Liver

Continue reading

Posted in beef, gluten free, paleo, perfect health diet | Tagged , , , , , , | Comments Off on Bolognese Sauce with Chicken Liver

Butter & Spice Carrots

According to my father, one of the only vegetables he could get me to eat as a kid were carrots cooked up with loads of butter. I still love carrots (and butter), and I use them frequently as a base in many recipes, but I almost never think to cook them on their own as a side dish. So, in celebration of the New Year, I’m re-introducing the beautiful and vitamin-rich carrot to my repertoire.

My recipe for Butter & Spice Carrots is simple – clocking in at about 15 minutes – and so delicious, that I’ve decided to make carrots a regular side dish from now on. First, the carrots are simply cut into uniform pieces (if you struggle with chopping, try using baby carrots of medium size and cut all of the carrots in half lengthwise).  Next, the carrots are briefly sautéed in butter, seasoned with five lovely spices + salt, and then finished with a few teaspoons of honey and a squeeze of lime. This recipe would make the perfect side dish for roasted chicken or fish.

IMG_0032

Continue reading

Posted in gluten free, paleo, perfect health diet, vegetarian | Tagged , , , , , , , | Comments Off on Butter & Spice Carrots